

Introduction
Go, also known as Golang, is a programming language created by Google that is easy to use, fast, and efficient. It is excellent for web development, and it is also highly scalable and efficient. It allows for concurrent execution and efficient use of multiple CPU cores.
When building web applications with Go, there are several popular web frameworks to choose from, such as Gin-Gonic, Echo, Fiber, Gorilla-Mux, and Buffalo. Gin-Gonic is the best option for building web applications among these frameworks. It is particularly suitable for both microservices and monolithic architecture.
This tutorial will use monolithic architecture with Gin-Gonic to build our web application.
Now, let's dive into the coding part of this article.
Prerequisite:
Before setting up our application, We must already have some basic setup in place:
A basic understanding of Go is required.
To use this program, we must have the Go compiler installed on our machine(the latest version is Go v1.19.5). If we have not installed the Go compiler, let's click here to download it and select the version compatible with our device's operating system.
follow the installation instructions specific to our operating system (Mac, Linux, or Windows).
Let's move on to creating a plan of action after covering the prerequisites in the previous section.
Our plan of action
This tutorial will establish a standard boilerplate code structure for a web application. We will use this structure to create API endpoints allowing user registration, authentication, and login. We will implement the repository pattern in our code.
The tools that we will be using are:
Gin-contrib session (HTTP sessions management)
After discussing our plans for this tutorial, let's move on to setting up our project with default routes.
Setting up our project and routes
First, Let's set up our work environment. If we are on Linux, open your terminal. If we are on Windows OS, let's ensure we have Git Bash installed and open it. Then, follow the instructions below:
Type
mkdir go-appand press Enter. This command creates a new directory for our application.mkdirstands for "make directory," andgo-appis the name of the created folder.Type
cd go-appand press Enter.cdstands for "change directory." This command changes our current working directory to the new directory for our application,go-app.Create a Go modules file to manage installed dependencies. We can find how to manage the Go modules file here.
Execute the
go initcommand like this one here👇
go mod init github.com/YourUserName/ProjectFolderName
Make sure to include the path to the project folder we just created.
The Command sample should look like this:
~ go mod init github.com/akinbyte/go-app
~ go: creating a new go.mod: module github.com/akinbyte/go-app
This command creates a go.mod file in the current working directory, where dependencies are installed and tracked. For more information on naming a module with a module path, refer to the section on managing dependencies.
To add the Gin framework as a dependency, use the
go getcommand to add the gin framework for our project: Like this 👇 in the terminal.go get github.com/gin-gonic/ginThis will download the dependency and manage it by the
go.modfile for easy access, which will be imported into our code later.At the terminal or command prompt, type in
code .to open up our project folder in VsCode Editor, or let's open the folder in our preferred IDE or text editor.Create a file named
main.gowithin the folder opened in the editor.
Assembling the code
Now that our project folder is set up, let's get to it in the code below:
In main.go
package main

import (
   "log"

  "github.com/gin-gonic/gin"
)

func main() {
   appRouter := gin.New()
   appRouter.GET("/", func(ctx *gin.Context) {
       log.Println("Creating a scalable web application with Gin")
   })

   err := appRouter.Run()
   if err != nil {
       log.Fatal(err)
   }
}
The
package maindeclaration is added at the top of themain.gofile, declaring it a standalone program.The necessary packages, such as the
logand Gin modules, are imported.The
mainfunction, which all other application parts will interact with, is created. It is the only function that the Go compiler recognizes during compilation and execution.A Gin instance was initialized using the
New()function, and the GET function was used to add a GET HTTP method with a relative path and an anonymous handler function.The
Runfunction attaches the Gin instance to anHTTPserver and starts listening and serving requests while also checking for errors.The
main.gofile is saved, and thego run main.gocommand is used to start the HTTP server where requests can be sent and responses received.The localhost web server is now running in the background. To test it, open a web browser and navigate to http://localhost:8080/. Check the terminal or command prompt for the output log.
FYI, 🙂 Gin server runs on 8080 as its default port.
Our web browser should display log information like the one below once we access the default page.
2023/30/01 03:05:06 Creating a scalable web application with Gin
👍 We have successfully started an HTTP server using Gin.
Now that our application is configured correctly and the server is connected securely, let's implement a package-based design for better structure, scalability, and efficiency.
Implementing package-based design
We'll use a package-oriented design to structure our application's codebase for scalability. This approach improves our code's organization, reproducibility, reusability, and understandability.
Additionally, it will make debugging errors in our code more manageable. As outlined below, let's create the necessary folders (packages) within the project folder.
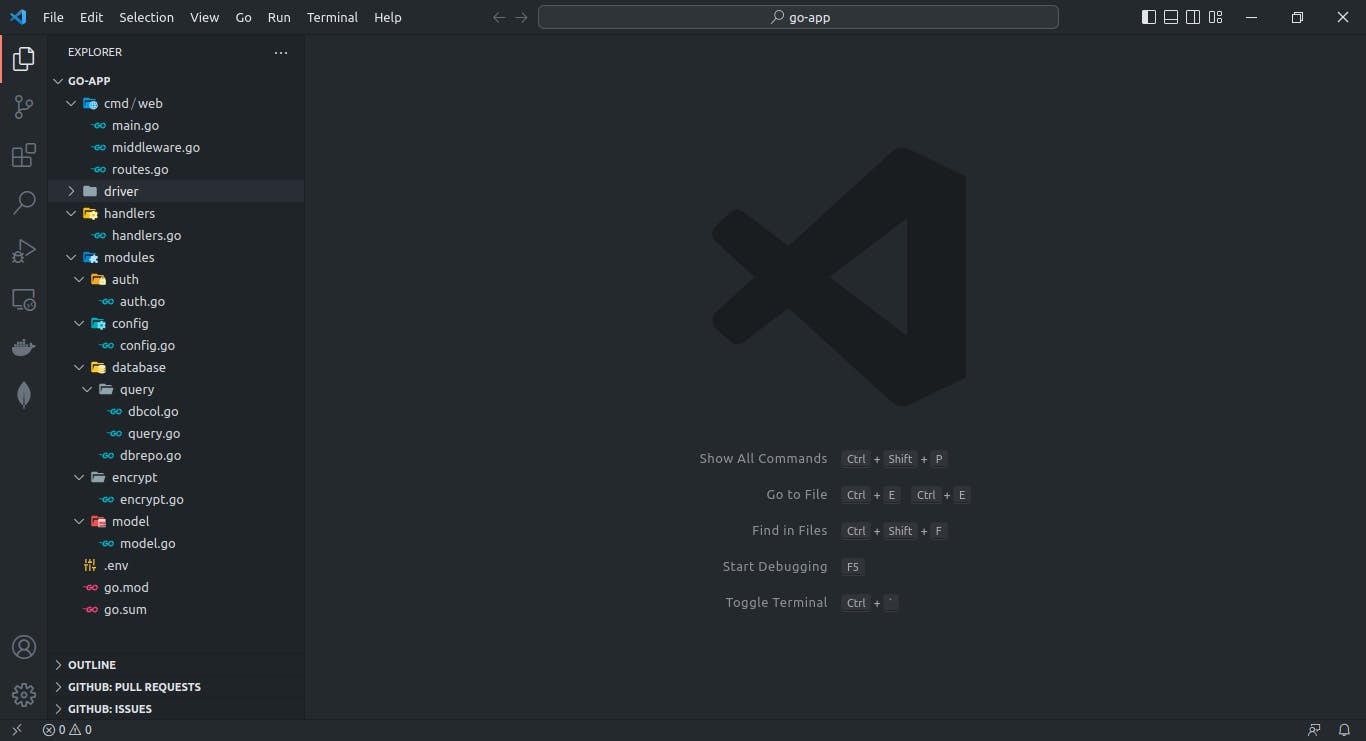
Our codebase has been restructured into various packages, and it is essential to understand the features of each package:
cmd/web: main package, which contains the main entry file, routes, and middleware.
driver: connects to MongoDB Atlas.
handlers: processes user requests.
modules: additional packages for specific functionality.
auth: generates and parses jwt(Json Web Token) tokens.
config: reusable struct fields.
database: interacts with collections and injects results to handlers.
encrypt: handles hashing and verification of user passwords.
model: holds user details and is crucial for the application.
Now that we have implemented a more efficient structure to guarantee a scalable application, let's develop structured models for the database.
Creating user database models
In this tutorial, we will use MongoDB as the database tool. The model package will define the structure of user collections in the database. We will use the Mongo-driver package to connect our Go code to the MongoDB database.
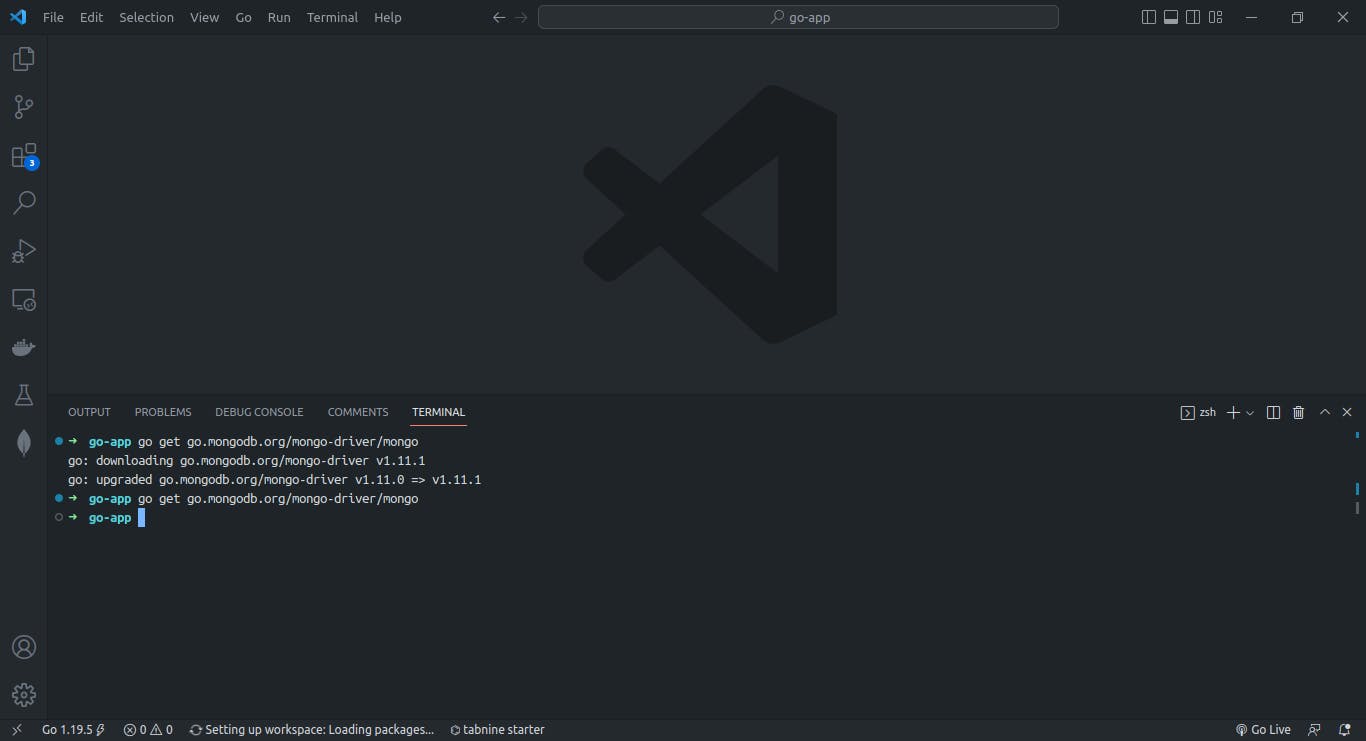
To install it, run the command go get like this 👇in our terminal.
go get go.mongodb.org/mongo-driver/mongo
When we run the command correctly, we should see results similar to those shown below, along with other necessary dependencies.
We might wonder why we install a database driver in our application when creating a model. This is because we need to set a specific unique ID field type for the user in the created model.
Let's create a struct type for the user model.
In model.go
package model

import (
    "time"

    "go.mongodb.org/mongo-driver/bson/primitive"
)

type User struct {
    ID         primitive.ObjectID `json:"_id" bson:"_id"`
    Name       string             `json:"name" Usage:"required"`
    Email      string             `json:"email" Usage:"required,alphanumeric"`
    Age        int                `json:"age"`
    Password   string             `json:"password" Usage:"required,alphanumeric"`
    Occupation string             `json:"occupation"`
    token      string             `json:"token"`
    Newtoken   string             `json:"new_token"`
    CreatedAt  time.Time          `json:"created_at"`
    UpdatedAt  time.Time          `json:"updated_at"`
}
We might need to register the model or assign a value to its field if it is to be stored as cookies in a session to make use of the data in the other handler's methods if needed.
Now that the database model has been created let's establish our MongoDB database.
Setup MongoDB Database with MongoDB Atlas
MongoDB is a popular NoSQL database that is structured and easy to use. To set up your cloud database with MongoDB Atlas, follow these steps:
Sign up for an account on the MongoDB Atlas website or sign in if you already have an account.
Once we log in, let's select the option to create a new cluster for free.
select the cloud service provider we want to use and follow the required steps to set up our cluster. If that is done, we should have a similar page as shown below.
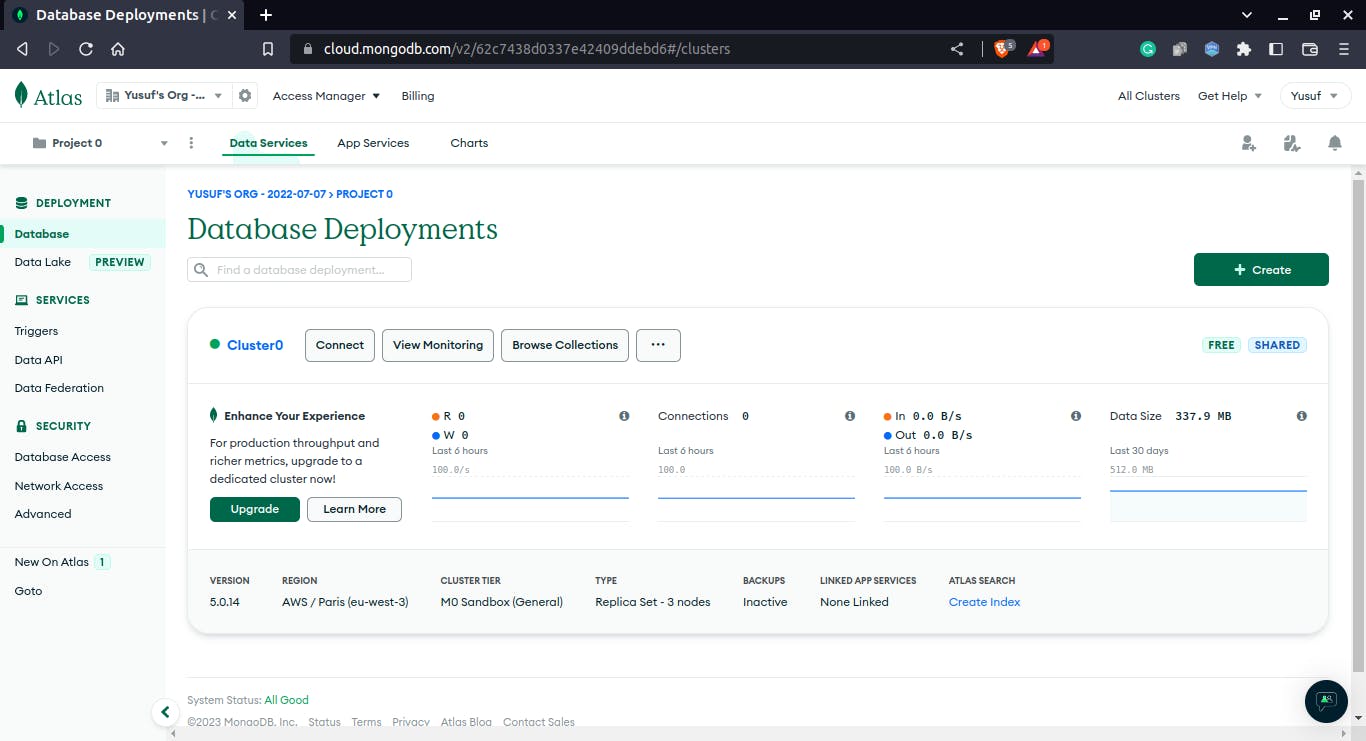
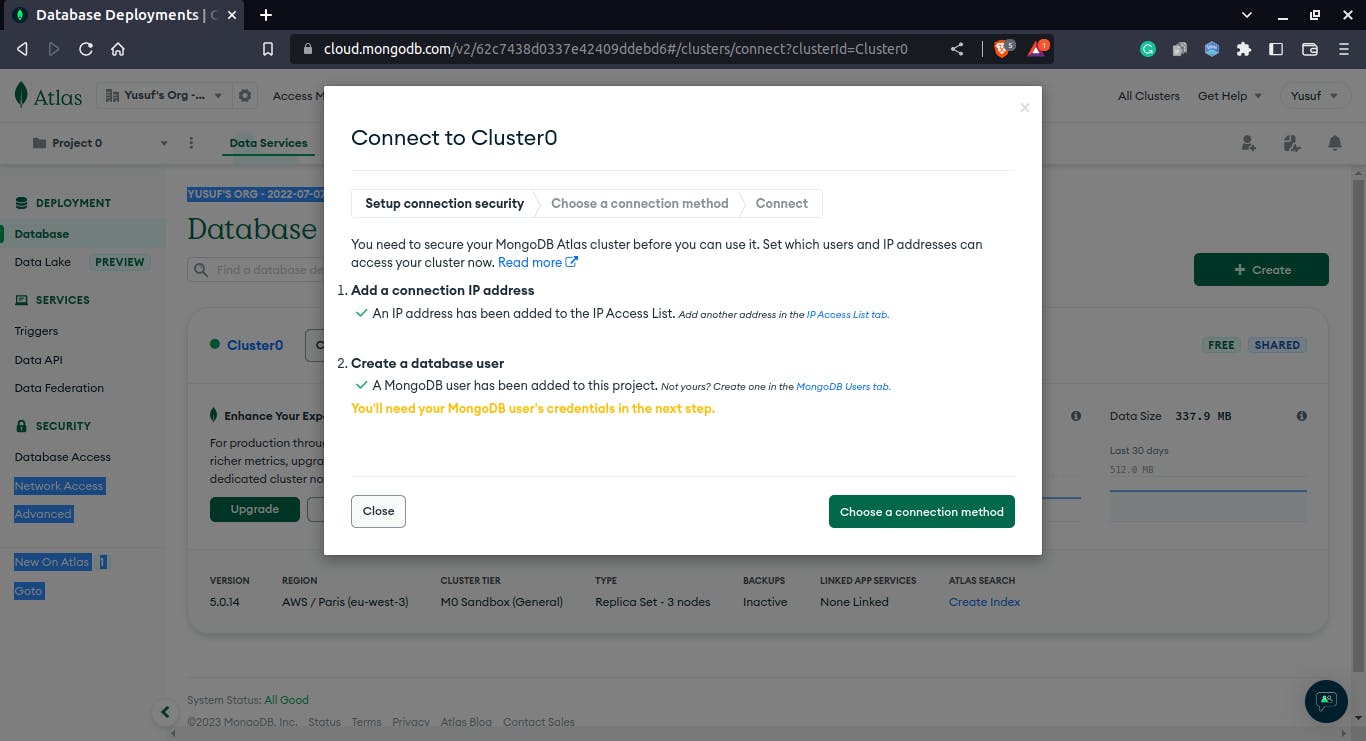
complete the highlighted setup connection security steps by clicking the Connect button.
Let's secure our MongoDB Atlas cluster, limit access to our IP address, or set it to the default IP address 0.0.0.0/0, allowing connections to MongoDB Atlas from any IP address.
Create a database user’s username and password, which we will use to grant the user access to the database and its collections.
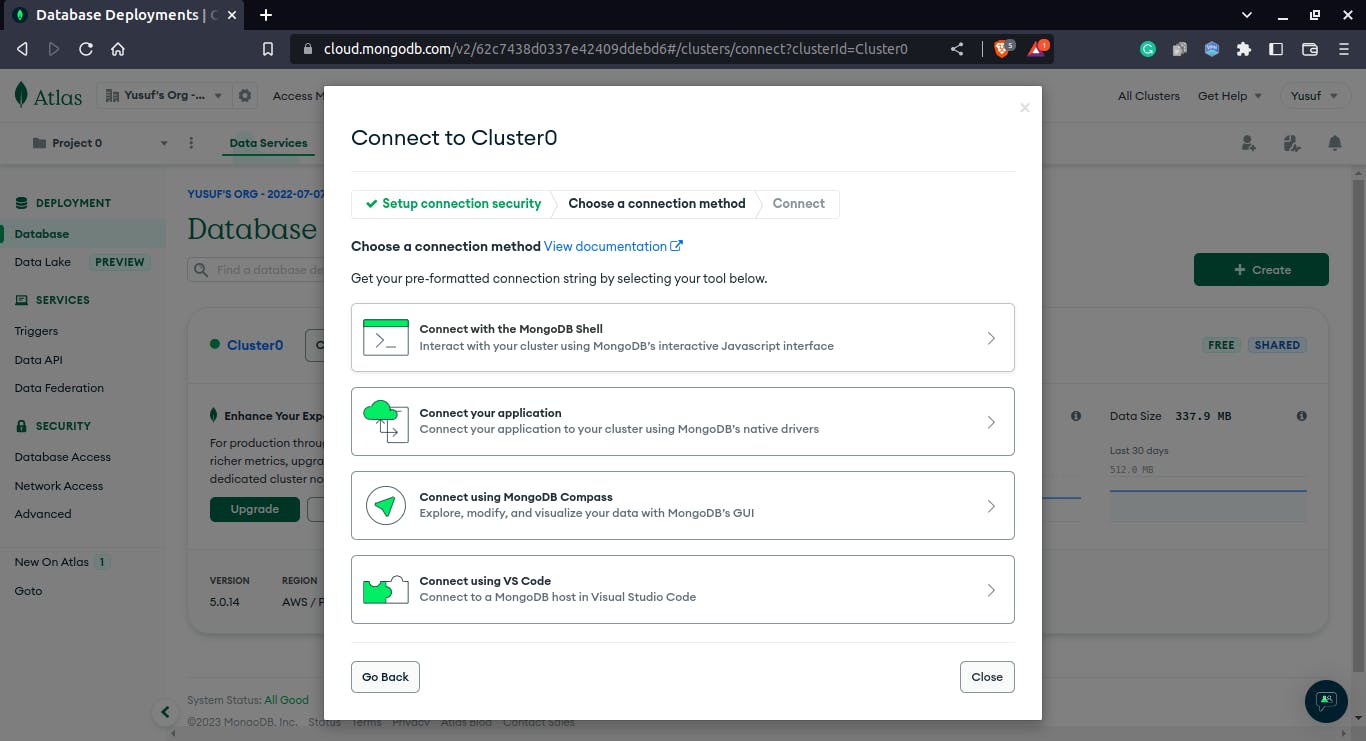
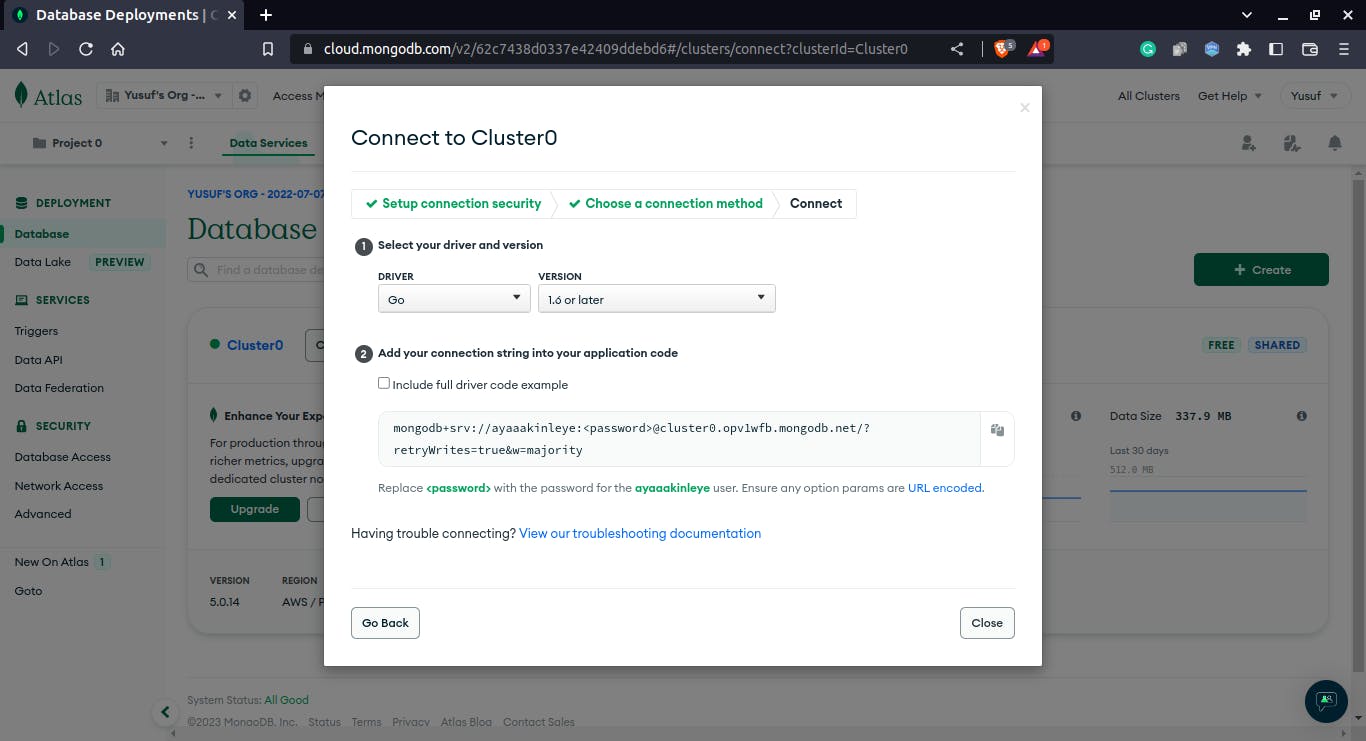
To establish a connection to the cluster, go to the Connection Method section, then click the Connect Your Application button. Choose the Go Driver for MongoDB and the desired version on the subsequent page. Finally, copy the connection string displayed and close the page.
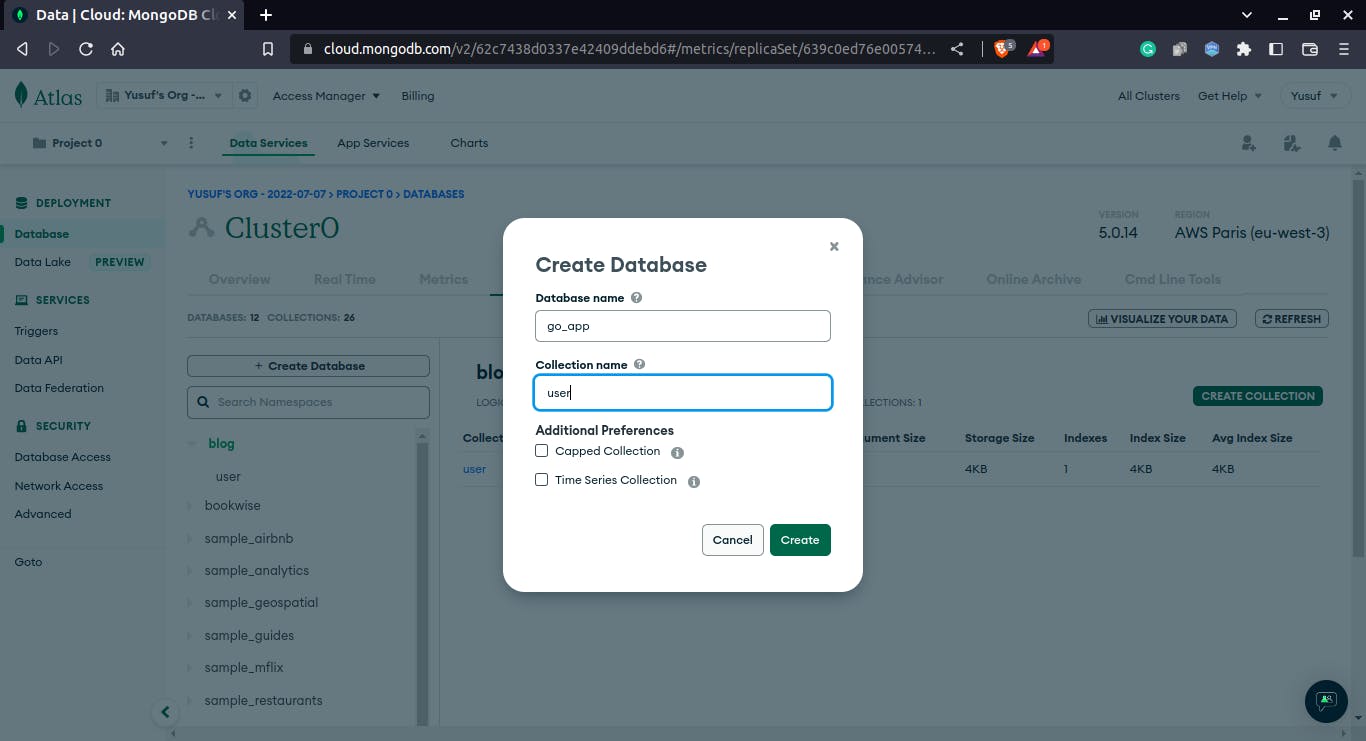
To access the sample databases and create a new one, navigate to the Database section in the top-left corner and select the Browse Collections button.
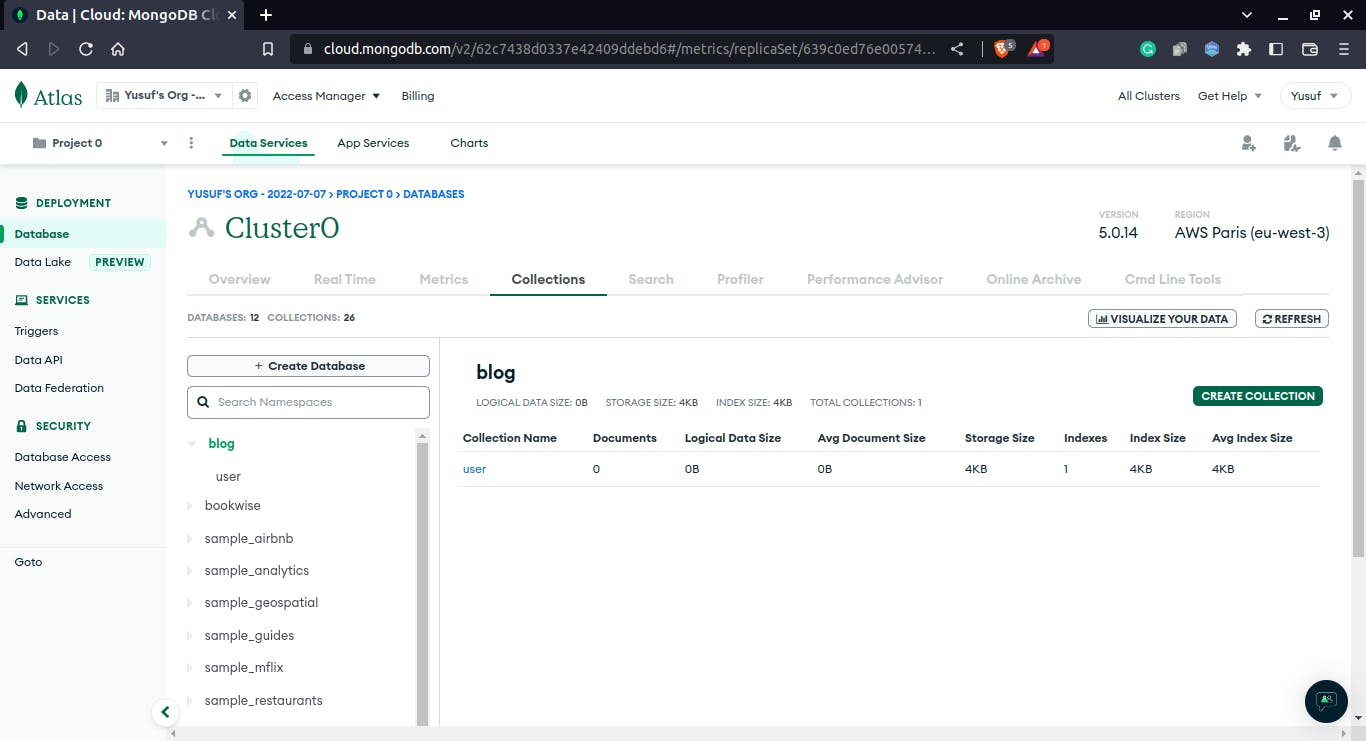
To create a database and add a collection, locate the Create Database option on the left side of the page and click on it. In this example, the database is named go_app, and the collection is named user. Other selection options can be ignored for now.
Create a
.env(environment variable) file in the root directory ofgo-appon the editor and paste the copied connection string as a value of the keyMONGODB_URI.Test the connection to the MongoDB database using MongoDB Compass and the user information provided in the connection string, then start interacting with the database.
MONGODB_URI=mongodb+srv://username:<password>@cluster0.byrpjo8.mongodb.net/test
Before we begin writing the code to connect to the database we just created, let's add some code to the config package to avoid constantly initializing the log package. To do this, create a new file called config.go into the package.
In config.go
package config

import (
  "log"

  "github.com/go-playground/validator/v10"
)

type GoAppTools struct {
  ErrorLogger log.Logger
  InfoLogger  log.Logger
  Validate    *validator.Validate
}
The GoAppTools struct contains three fields, ErrorLogger, InfoLogger and Validate. ErrorLogger field helps track and log errors, and the InfoLogger field logs information during debugging or checking the output in specific packages. In contrast, the Validate field is meant to validate the input value concerning the struct tags.
After we finish that, open up the driver package and add a driver.go file.
In driver.go
package driver

import (
  "context"
  "github.com/akinbyte/go-app/modules/config"
  "time"

  "go.mongodb.org/mongo-driver/mongo"
  "go.mongodb.org/mongo-driver/mongo/options"
)

var app config.GoAppTools

func Connection(URI string) mongo.Client {

  ctx, cancelCtx := context.WithTimeout(context.Background(), 100time.Second)
  defer cancelCtx()

  client, err := mongo.Connect(ctx, options.Client().ApplyURI(URI))
  if err != nil {
      app.ErrorLogger.Panicln(err)
  }

  err = client.Ping(ctx, nil)
  if err != nil {
      app.ErrorLogger.Fatalln(err)
  }

  return client
}
To connect to the MongoDB database, we took the following steps in the code above:
We Initialised the app variable of type
GoAppConfigto make access to the struct field defined earlier.We define the
Connectionfunction with a string parameter calledURI.In the function defined, we create a context that helps carry a deadline, cancellation signal, and other request-scoped values across API boundaries and between processes.
This context ensures the application is connected to the database within the set timeout duration when the web server starts running. If the database is not connected within the set time, the context gets canceled, and the web server will stop immediately.
Connect to the MongoDB database by passing the context as an argument, applying the
URIconnection string, and checking for errors while connecting.Verify the connection by pinging the database.
Return the database client.
Call the Connection function to ensure a constant connection to the database.go file, and pass the URI value as an argument.
Install the package github.com/joho/godotenv from the terminal. This will allow the loading of URI from the .env file.
go get github.com/joho/godotenv
In main.go
package main

import (
  "context"
  "log"
  "os"

  "github.com/gin-gonic/gin"
  "github.com/joho/godotenv"
  "github.com/akinbyte/go-app/driver"
  "github.com/akinbyte/go-app/modules/config"
)


var app config.GoAppTools

func main() {
  InfoLogger := log.New(os.Stdout, " ", log.LstdFlags|log.Lshortfile)
  ErrorLogger := log.New(os.Stdout, " ", log.LstdFlags|log.Lshortfile)

  app.InfoLogger = InfoLogger
  app.ErrorLogger = ErrorLogger

  err := godotenv.Load()
  if err != nil {
      app.ErrorLogger.Fatal("No .env file available")
  }
  uri := os.Getenv("MONGODB_URI")
  if uri == "" {
  app.ErrorLogger.Fatalln("mongodb uri string not found : ")
  }
  // connecting to the database
  client := driver.Connection(uri)
  defer func() {
      if err = Client.Disconnect(context.TODO()); err != nil {
          app.ErrorLogger.Fatal(err)
          return
      }
  }()

  appRouter := gin.New()
  appRouter.GET("/", func(ctx *gin.Context) {
      app.InfoLogger.Println("Creating a scalable web application with Gin")
  })

  err = appRouter.Run()
  if err != nil {
      app.ErrorLogger.Fatal(err)
  }
}
Now that the database has been set up and connected correctly let's connect it to our previously created database and its user collection.
In the database folder, open dbcol.go in the query subfolder. In this file, we will define a user function that takes in arguments of type mongo.Client and a string and returns a mongo.Collection type.
This function will be called in the queries method to access the user collection in our go _app database on the cloud when writing queries to interact with the data.
In dbcol.go
package query

import "go.mongodb.org/mongo-driver/mongo"


func User(db mongo.Client, collection string) mongo.Collection {
  var user = db.Database("go_app").Collection(collection)
  return user
}
Scalability is achieved when an application is easily managed and modified without doing more damage to the codebase as the application grows in use.
Before we start writing out the queries to interact with the database, we need to structure how we will access the database and its user collection in the most appropriate and the future.
In query.go
package query

import (
  "github.com/akinbyte/go-app/modules/config"
  "github.com/akinbyte/go-app/modules/database"
  "go.mongodb.org/mongo-driver/mongo"
)

type GoAppDB struct {
  App config.GoAppTools
  DB  mongo.Client
}

func NewGoAppDB(app config.GoAppTools, db mongo.Client) database.DBRepo {
  return &GoAppDB{
      App: app,
      DB:  db,
  }
}

func (g *GoAppDB) InsertUser() {
  return
}
We will create a struct type named GoAppDB, with two fields: App of type config.GoAppTools and DB of type pointer to mongo.Client. It's important to note that the interface type can represent multiple types. When a function returns an interface, the returned value can be of any type, such as string, int, struct, etc.
Next, we define NewGoAppDB, a function that takes in arguments of the same types as the struct fields created above and returns a type database.DBRepo, an interface with a returned GoAppDB struct value.
After that, we can create the query methods to implement a pointer to the GoAppDB struct type, allowing easy access to its defined fields. InsertUser is an example of a query method that will be defined in the query.go file, and we will modify it as we proceed. All the defined methods will be added to the DBRepo interface.
In a nutshell, we are creating a struct type GoAppDB that contains two fields, App and DB. We create a function that returns an interface of the database.DBRepo type with a returned GoAppDB struct value. Then, we can generate query methods with a pointer to the GoAppDB struct type to easily access its fields and be added to the DBRepo interface.
All necessary setups to interact with our database using queries in MongoDB are in place. Let's add up the encrypting and verifying procedure for the password.
Password Encryption and Verification
It's best practice to encrypt passwords and, if necessary, other user details before storing them in the database for our application to be secured from any external access.
Firstly, our goal in this section is to encrypt/hash the password input by the user while creating an account and verify the input password compared with the previously hashed password while logging in. Let's get started.
In encrypt.go
package encrypt

import (
   "fmt"
   "golang.org/x/crypto/bcrypt"
)

// Hash: Encrypt the user password into a slice of bytes and
// and return a string of the converted bytes
func Hash(password string) (string, error) {
   if password == "" {
       return "", fmt.Errorf("no input value")
   } else {
       GenPassword, err := bcrypt.GenerateFromPassword([]byte(password), bcrypt.DefaultCost)
       if err != nil {
           return "cannot generate encrypted password," err
       }
       hashedString := string(GenPassword)
       return hashedString, nil
   }

}
At first, we utilize the bcrypt package, which incorporates the bcrypt adaptive hashing algorithms developed by Provos and Mazieres.
Our Hash function takes in a password of string type, input by the user, and returns a string and an error type.
If the input password is empty, the function returns an empty string with an error message. Otherwise, the bcrypt hash of the input password at the default cost is generated, errors are checked, the resulting slices of bytes are converted to a string, and the Hash function will return the hashed password without any mistake.
The hashed password will be stored in the user collection of the database, which we will do later on.
still in encrypt.go
// Verify: this helps to verify the input password while logging in
// and the previously hashed password
func Verify(password, hashed password string) (bool, error) {
   if password == "" || hashedPassword == "" {
       return false, nil
   }
   err := bcrypt.CompareHashAndPassword([]byte(hashedPassword), []byte(password))
   if err != nil {
       if err == bcrypt.ErrMismatchedHashAndPassword {
           return false, fmt.Errorf("invalid string comparison: %v", err)
       }
       return false, err
   }
   return true, nil
}
The Verify function compares and verifies the input password provided by the user with the hashed password stored in the database, utilizing the arguments passed to the function. If the passwords do not match, an error is checked for, and an actual value is returned if they match.
Conclusion
This article briefly covers the Go programming language and its common web frameworks. It also teaches how to set up a project with the Gin framework, including creating a structured model, integrating MongoDB Atlas as a cloud-based database, and implementing password encryption and verification.
In the next part, we'll focus on user registration and login and further explore other integrations. 👏We've come this far, mate. Thank you for reading.
You can get the GitHub repo of the tutorial here. Happy coding 😀.